Learn how to install Sass on Ubuntu via command line, guidelines for a standard folder structure, and how to organize the related Sass files with examples.
In this blog, we are going to learn how to install sass and a standard folder structure for web applications. Mainataninace is the key point for a clean and clear project, so our project outline and structure of the folder define how good we are at maintenance. Here is the step-by-step procedure to install the sass project and usage.
Steps to install sass
At the very initial step, we have to install the node packages. If you have a node already then always try to upgrade to the latest version.
Install node js
Initially check for the node version and the command is given below
$node -v
#If you already have the node, then upgrade to the latest version, and here is the command
$npm install n -g
#If not, please download nodejs and npm with the below commands.
$sudo apt install nodejs -y
$sudo apt install npm -y
$node -v
$npm -v
After the successful installation of node and npm, we need to install sass packages and the command is
$sudo apt install ruby-sassNow I’m going to install sass and their respective packages for the specified project. First, we need to navigate to the project and then install sass packages. In my case, I have created a sass project in the below-given path
$cd /home/navya/Documents/scss/project-scss (my project folder path)After that please follow the below-given commands to install the sass packages in your project.
$npm init
$npm install node-sass --save-dev
#if we need jquery packages, then we can use the below command to install the packages.
$npm install jquery --save
$npm install
Observe the package.json file to see all the dependencies that have been installed and in which place they are enabled.
After the successful installation of sass packages from the above commands, then we need to create the required files in the project directory. So we are going to create all the required folders and files for our project in the next step.
Project setup
Initially, we have to navigate to the project folder and then we need to create the following folders.
$cd /home/navya/Documents/scss/project-scss
$touch index.html
$mkdir css
$cd css
$touch style.css
$cd ..
$mkdir scss
$cd scss
$touch main.scss
Once you are done with the creation of outline files, we need to add the sass compile command in the scripts which is present in the package.json file, and the related code is given below.
"scripts": {
    "compile:sass": "node-sass scss/main.scss css/style.css"
  },
Let me explain to you the meaning of that one line written in scripts,
compile:sass: This is used to compile our scss code to CSS
node-sass: This defines node-sass package
scss/main.scss: This is the path of the sass file and it depends on the individual project folder structure
css/style.css: This is the path of the CSS file
Note: Currently you are compiling all scss files to a single CSS file but you can also write on compiling multiple scss files to multiple CSS files
Compilation process, we have to execute the command every time whenever we do save the file. It is a time-consuming process, so we have another amazing option in sass that is keeping sass in watch mode and do start developing all your styling work in the respective sass folders. For that, we need to update our scripts block as given below
"scripts": {
    "compile:sass": "node-sass scss/main.scss css/style.css",
    "watch:sass": "node-sass scss/main.scss css/style.css -w"
  },
So far, we have created a sass and CSS file in their respective folders and our final goal is we have to compile all the code that is written in sass files to the css file which is a minified file. To compile sass here is the command.
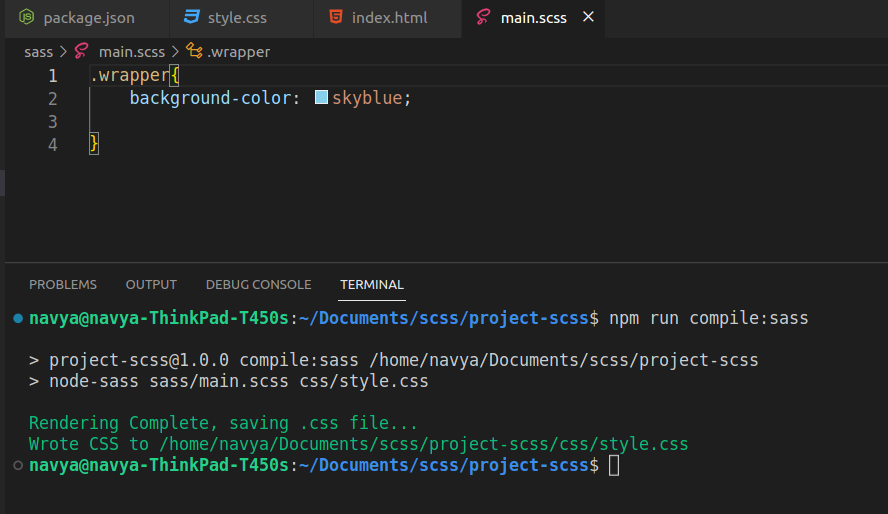
$npm run compile:sassRight after this command is entered, the sass will compile and shows a compiled message as shown below
After updating the watch sass command in the script file please save your file and run the below command once then sass starts watching all the changes that we made in the respective folders till the time we close the editor. Here is the command and screenshot for your reference.
$ npm run watch:sass
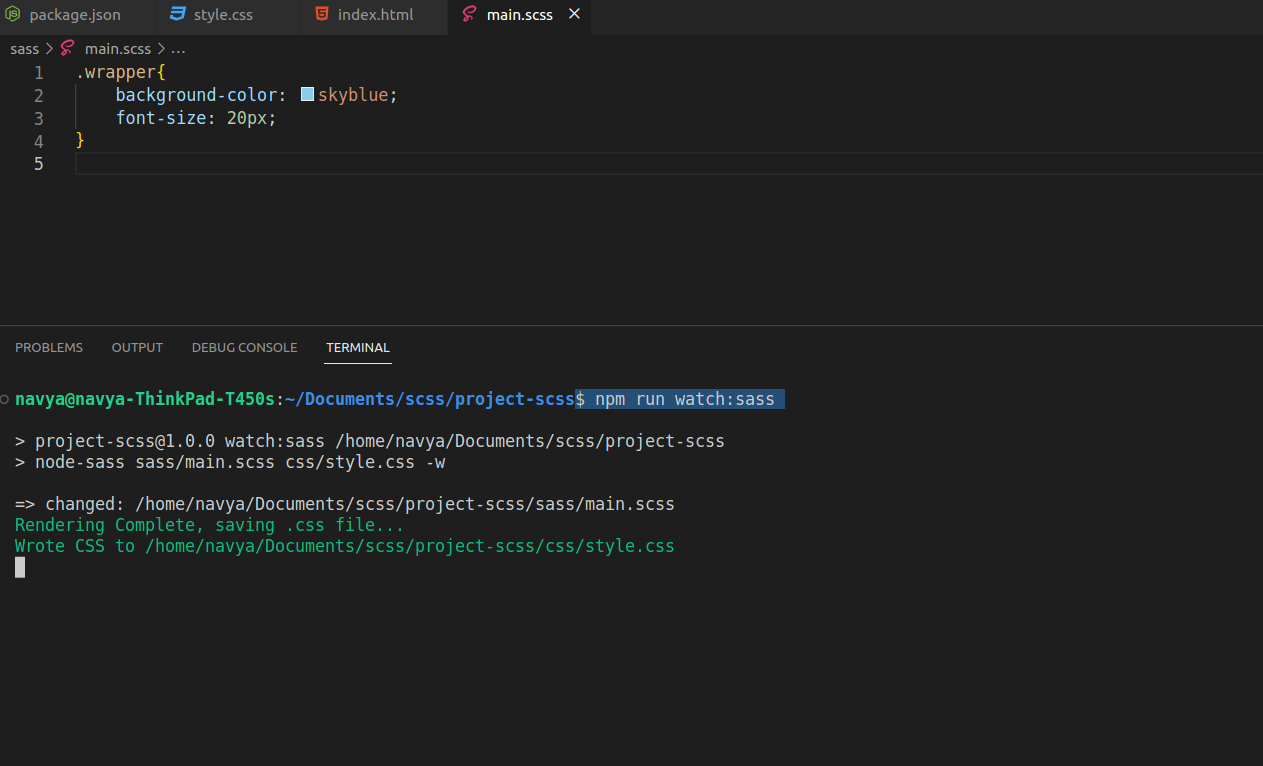
If you observe the above two screenshots, if we do compile then sass will compile and terminates the action. If we do npm run watch:sass, then the terminal won’t terminate and will continuously watch the changes.
So, guys if your editor is giving results like the above screenshot, great !! congratulations !! you have successfully compiled your sass code. If not, please mention your queries in the comments, will reach out to you very soon.
Standard folder structure
Any project should be well organized to avoid confusion and should be crystal clear for further development. So we have to be very conscious about the structure of folders in different technologies that we use in any type of web application development. Here is the standard folder structure for sass.
Abstracts
In general words, abstract means detached or pull away. So whatever is under the abstract folder in sass can be standardized and reused. Here is the list and a brief explanation of what kind of data is going to be filled in that folders.
- _function.scss: All the css functions can be defined in this file only one time, and we can use that same function in multiple files where ever it is needed
- _mixins.scss: Some css properties don’t render in all the browser versions of all types. Click here to know the browser-dependent css properties. In sass we no need to write those prefixes manually, we can generate them via mixins. So all the browser dependant sass mixins should go in this file. Check here for mixins. (need to add a link here).
- _variables.scss: One of the powerful concepts in sass is variables. Defining all the primary, secondary and related typography can be added in this file, and we use these variables in other files where ever required. So, if we want to change the primary color of the site it is enough to update that respective color value in the variable instead of modifying all the files. Example for defining variables in sass is $color-blue: #26B2EC;
- _animation.scss: The name of the file itself indicates that all the animation-related stuff will go here.
Components
The name of the folder itself indicated that all the files and components will follow this one principle, define once use multiple. So all the components like buttons, cards, and popup UI, will be written in such a way that these classes can be used across the folders.
- _button.scss: All the types of button-related styles will be written for one class in this file and that class will directly be used in html elements. This type of development will save time, space, and effort and will increase the performance and productivity of the site.
- _cards.scss: All the card’s styling will be done for one class and that class can be added to any number of HTML elements across the site
- _form.scss: Considering form is also one component, writing all the form-related css to one class here and the related classes will be used in html file as per required.
- _popup.scss: Popup is a very frequently used component in any web application. There are multiple popup designs available, so based on the requirement we will be adding the css and will use that classes where ever required.
Layout
The layout folder should always have the below three files. For individual websites, there should be only one header and one footer, in the case of the navigation menu we can have multiple menus based on the requirement.
- _header.scss: All the header-related css will be written in this file. It is very easy to maintain and organize code if we do it by dividing it into multiple components.
- _footer.scss: All the footer-related css code will be written here
- _navigation.scss: All the primary, secondary, and any navigation-related styles will go in this file.
Pages
Depending on the requirement and project weight, we have to maintain one individual sass file for the respective pages. Considering a blogging website as an example we can create the css files given in below and the respective styling goes into the respective files.
- _home page
- _blog page
- _user page
- _snippet page
- _login page
- _dashboard page
- _article page
Finally, I just want to conclude that for any web application maintenance of the code base is very important and that helps people to understand the flow of development. So for sass, the above-given steps should be followed.

Comments