It's an excellent project to build a web calculator, especially if you're learning JavaScript for the first time. For anyone with any level of expertise, it is quite straightforward. The interactions with UI and important JavaScript methods are covered in this project.
In this article, you will be taken through the various HTML and CSS elements along with JavaScript used in building a functional and responsive calculator, as shown in the image below:
The calculator's design
Consider the fundamental capabilities of a calculator before you begin. These operations naturally include the capability to operate on decimal values, as well as addition, subtraction, multiplication, division, delete, and all-clear.
In your text Editor, We need to create three separate files in one folder for your HTML, CSS, and JavaScript. Your code becomes better organized as a result of this.
The following code can be used to link CSS and JavaScript files in your HTML folder:
HTML code
index.html
<!DOCTYPE html>
<html lang="en">
  <head>
    <link rel="stylesheet" href="./style.css" />
    <title>Document</title>
  </head>
  <body>
    <div class="container">
      <div class="container2">
        <input type="text" placeholder="0" id="calc" />
        <button onclick="Cl()" class="red">AC</button>
        <button onclick="del()">DEL</button>
        <button onclick="keypad('%')">%</button>
        <button onclick="keypad('/')">/</button>
        <button onclick="keypad('7')">7</button>
        <button onclick="keypad('8')">8</button>
        <button onclick="keypad('9')">9</button>
        <button onclick="keypad('*')">*</button>
        <button onclick="keypad('4')">4</button>
        <button onclick="keypad('5')">5</button>
        <button onclick="keypad('6')">6</button>
        <button onclick="keypad('-')">-</button>
        <button onclick="keypad('1')">1</button>
        <button onclick="keypad('2')">2</button>
        <button onclick="keypad('3')">3</button>
        <button onclick="keypad('+')">+</button>
        <button onclick="keypad('.')">.</button>
        <button onclick="keypad('0')">0</button>
        <button onclick="e()" class="equal">=</button>
      </div>
    </div>
    <script src="./script.js"></script>
  </body>
</html>
Your calculator would now display something like this:
![]()
Here is the basic styling for this project.
CSS for the project
style.css
* {
  margin: 0;
  padding: 0;
  box-sizing: border-box;
 }

body{
  background-color: #ecf;
  font-family: sans-serif;
  outline: none;
}

.container {
  height: 100vh;
  display: flex;
  align-items: center;
  justify-content: center;
}

.container2 {
  background-color: #fff;
  padding: 15px;
  border-radius: 30px;
  box-shadow: inset 5px 5px 12px #ffffff, 5px 5px 12px rgba(0, 0, 0, 0.16);
  display: grid;
  grid-template-columns: repeat(4, 68px);
}

input {
  font-size: 50px;
  text-align: end;
  margin: 1rem auto;
  grid-column: span 4;
  height: 70px;
  width: 260px;
  border: none;
  border-radius: 25px;
  color: rgb(70, 70, 70);
  background-color: #fff;
  box-shadow: inset -5px -5px 12px rgba(0, 0, 0, 0.16),
    5px 5px 12px rgba(0, 0, 0, 0.16);
}

button {
  font-size: 16px;
  color: #fff;
  height: 48px;
  width: 48px;
  border: none;
  background-color: #000;
  margin: 8px;
  border-radius: 50%;
}

.equal {
  border-radius: 40px;
  background-color: #000;
  width: 115px;
  box-shadow: -5px -5px 12px #ffffff, 5px 5px 12px rgba(0, 0, 0, 0.16);
}

.red {
  background-color: #f00f00;
}
JavaScript functionality
Here I had created the variable as result by getting the value just write document.getElementById(“calc”). So Everything in the input value can be saved in to the result variable.
We need to create function, that displays for all the numbers in between the function we create result.value += num.
If we want to add a function to the equal button. So here two thing must be known. One is empty value and the other is infinite value. Function will execute if the given values are valid else alerts the value.
We need to write clear and delete functions as well.
Here is the complete code.
script.js
let result = document.getElementById("calc");

function keypad(num){
    result.value += num;
}
function e(){
    try{
        result.value = eval(result.value);
    }
    catch(err){
        alert("Invalid")
    }
}

function Cl(){
    result.value = "";
}

function del(){
    result.value = result.value.slice(0,-1);
}
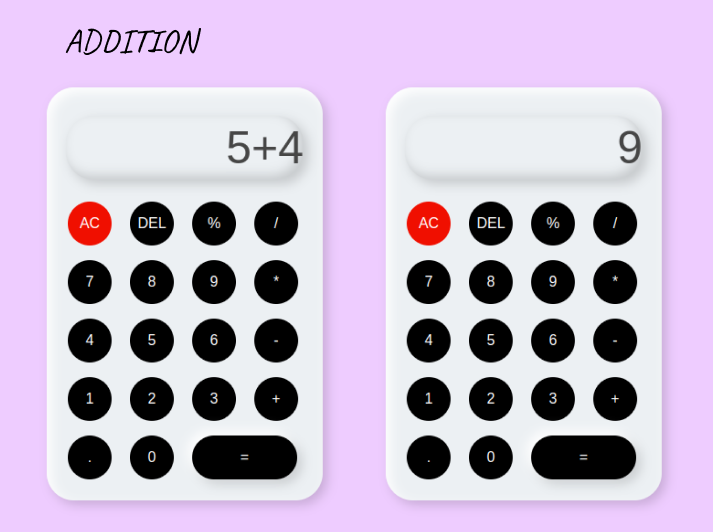
Let’s do result analysis of our calculator app.
Final Results


Conclusion
We used ES6 classes to arrange our code while creating the calculator. Additionally, We used CSS flexbox, CSS grid, and Javascript to build our dynamic calculator. Thank you for reading.


Comments